
What you will need:
Stock Image 1
Stock Image 2
Stock Image 3
GPS (Gimp Paint Studio) addon (suggested, not required.)
Suggested Prerequisites:
An understanding of how Layer Masks and Layer Modes work.
An understanding of how the color modification tools work.
An understanding of my Photo Editing Principles.
Suggested Tools:
Wacom Tablet
Raw-Shooting Camera. (Check out my list of affordable Raw-Shooting Cameras)
Tripod
Gimp Bible
My eBook on Layer Masks.
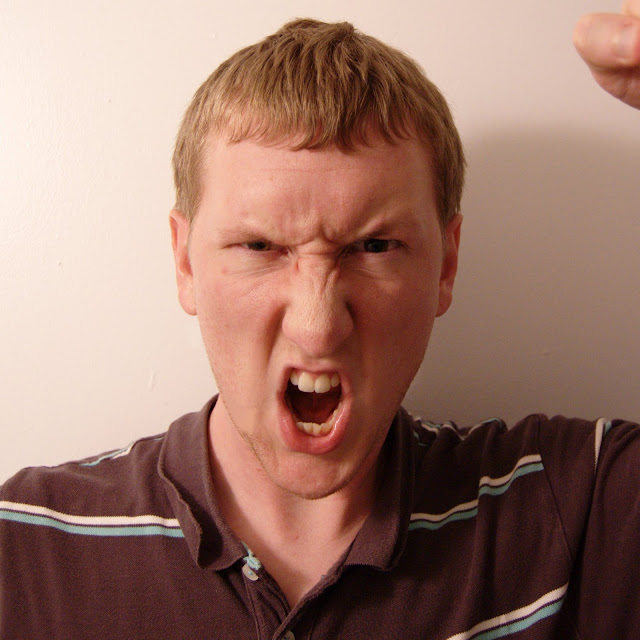
We're going to start with this photo:
 |
| Reminds me of the old iPod commercials...who knew they were secretly zombies? |
Right-click on the silhouette layer mask, and click "mask to selection."
Right-click on the original image, and click "add layer mask." initialize the layer mask to "selection." This will transfer the black and white image you created to an actual layer mask.
delete the previously created black and white layer. You no longer need it. You'll end up with this:
 |
| Ugh. Zombie Breath. |
Adding a good background to this zombie tutorial was vital in keeping a good effect, without taking away from the zombie itself. After a lot of searching, I found the perfect stock image for it.
Insert the background stock image you downloaded earlier under your existing face layer by clicking file>>>open as layers>>>(browse to the file)
Drop the file down underneath the original human layer.
create a new layer. Name the layer "BGLightFix" Set the layer mode to overlay. Place this layer
in-between your background and zombie layers.
Fill the BGLightFix with a white to black gradient (going from left to right.) This will make the background look like the light is coming from the same side as the light came from in the zombie image.
 |
| The hotel background really sets the mood for the rest of the image, I thought. |
Create a new layer, name the layer "EyePop." Set the layer mode to overlay, and fill the layer with black. Adjust the opacity to 80.
Add a layer mask, initialize the layer mask to white (full opacity.)
Using the brush tool, and ensuring you're editing the layer mask, brush the eyes black to remove the overlay from them. This is vital to making the eyes pop out.
Create a new layer, name the layer "ColorReduce." set the layer mode to color, and fill the layer with black. Adjust the opacity to something you like. (Mine is set to 80.) It looks like this:
 |
| Adjusting the tones of the images makes me look more zombie like, and also sets a creepy mood for the image. |
MAKE
SURE EVERY LAYER ADDED FROM HERE ON IS PLACED UNDER THE "COLOR REDUCE"
"EYEPOP" AND "BLUETINT" LAYERS. otherwise something will look "funny" in
your image.
Zombie Tutorial Part 3 - Grunging it up.
No zombie should be clean. Not one square inch.Create a new layer, name it "dirt." set the layer mode to burn, and fill the layer with black.
Add a layer mask, initialize the mask to black (full transparency.)
Using the brush tool, find a brush that creates small particles (a great example is the "dust" preset from Gimp Paint Studio) brush the dirt layer mask with white until you end up with something like this:
 |
| My Gimp Zombie Tutorial will make your zombie dirty. |
Add a layer mask, initialize the layer mask to black. (full transparency)
Using the brush tool, and brushing on the blackeyes layer mask, fill the whites, iris, and pupil of each eye with black.
Create a new layer, name the layer "EyeHighLight." Fill the layer with white, and set it's layer mode to "screen."
add a layer mask, initialize the layer mask to black (full transparency.)
Using the brush tool, and brushing on the EyeHighLight layer mask, brush a small circle, in the left eye and a small crescent shape in the right eye. This is meant to emulate light coming from a light source, and helps keep depth in the eye. It looks like this:
 |
| A lot of people go with the glowy white zombie look. I always thought that just looked like a Night Elf. I don't want to be a Night Elf, I want to be a ZOMBIE! |
Add a layer mask, initialize the layer mask to black (full transparency.)
Using a soft brush, brush around the lower side of each eye to create some eye pockets, making our zombie look more sick.
Zombie Tutorial Part 4 - The Gashes
If you take your time giving your zombie gashes, and actually add the shadows properly, these can make or break the image.
Now create a series of three layers. Set each layer to overlay. Fill each layer with black, and have a layer mask initialized to Black (full transparency) on each layer. Name one "Form", one "Cut," and another "Shadow."
Create a few paths that can serve as gashes, like you see in the image below:
 |
| Don't try to make the gashes jagged. The goal of the paths tool is just to create the general shape. We'll make the edges more rough later. |
click on your "form" layer mask, and fill the selection with white.
Click on your "Cut" layer mask, and fill the selection with white.
Repeat this process for each gash you created. Mine look like this:
 |
| Note that my top path was actually done by stroking a path, not filling a selection from a path. That's why it looks different. |
 |
| And this is why we have two separate layers. Together they will create rough edges, and a "light red ring" around the gash, as if the skin were irritated, or raised up a bit. |
 |
| And this is why we have the third layer, specifically for the shadows that really pull the gashes together. |
I added a few more gashes using the same steps above to my neck and the opposite side of my face.
Here is what I ended up with:
 |
| No Gimp Zombie tutorial is complete without some sort of blood splatter. |
I had no idea what to do with the hair honestly, so I just made my zombie hair dark.
Create a new layer, fill the layer with black, and set the layer mode to "burn." Adjust the opacity to 50 percent, and name the layer "hair blacken."
Add a layer mask to the hair blacken layer and initialize it to black (full transparency).
using a soft brush tool, and ensuring you're working on the hair blacken layer mask, carefully brush the zombie's hair white. I ended up with this:
 |
| Truthfully, I wish I were balding at this point. |
click file>>>open as layers>>>browse to the file titled "Rust_by_struckdumb.jpg" that was previously downloaded.
This should insert the rust image as a new layer into your current zombie image. Move this image directly above your original zombie image (that way every other layer is above it.)
click on colors>>>curves, and adjust the curves of the rust until you get a very strong contrast of white and black between the parts.
Rotate and scale the rust image. Your image should now look something like this:

Make sure you're editing the rust layer's layer mask, and click colors>>>invert
set the layer mode to overlay. You should end up with this:
 |
| Think about what the grayscale copy of layer initialization did here. As the rust gets lighter, it gets more transparent. The dark parts stay opaque, emulating cracked skin fading back into normality. |

Using a rough white brush, brush on the newly duplicated rust layer's layer mask and remove parts of the rust that made the image too dark. I ended up with this:

fill the newly duplicated rust layer with black. Keep the layer mask as it is.
click on the layer mask, click filters>>>blur>>>Gaussian blur
blur the layer mask a bit. This will make the skin in-between the cracks appear red and irritated. I ended up with this:

The rust image you use here makes your skin look absolutely disgusting! It would be perfect to use for burnt skin, or - well...a zombie!
click file>>>open as layers>>>browse to the file titled "Rust_Bubbles_by_DimondDoves.jpg"
Move this layer directly above the original zombie layer.
desaturate the new rust layer
click colors>>>curves>>adjust the curves so that the rust has a dramatic difference between white and black.
Scale, rotate, and skew the rust image in a way that you're happy with it. Mine ended up like this:
 |
Add a layer mask. set the layer mask to black (full transparency).
using a white brush, brush on the layer mask to remove the rust so it looks something like this:
 |
| Yuck. |
click file>>>open as layers>>>browse to the file titled "Rust_by_struckdumb.jpg" that was previously downloaded.
click filters>>>blur>>>Gaussian blur>>>blur the inserted rust image slightly.
move and rotate the rust image toward the chin. I ended up with this:

using a rough white brush (like the previously mentioned oil brush preset from GPS), mask off the layer so the bloody patch only shows up on the chin and some of the teeth. I ended up with this:


Add 3 layers named "blood 1" "blood 2" and "blood 3." Set each one to layer mode "overlay" and add a black layer mask to them. Fill each layer with a deep red color.
on the blood 1 layer, use a white splat-type brush (like the GPS dust brush) and a few other rough brushes on the layer mask. Brush the shoulders and neck area to make shirt look bloodstained. I ended up with this:


 |
| The dark red instead of black makes great bloodstains. |
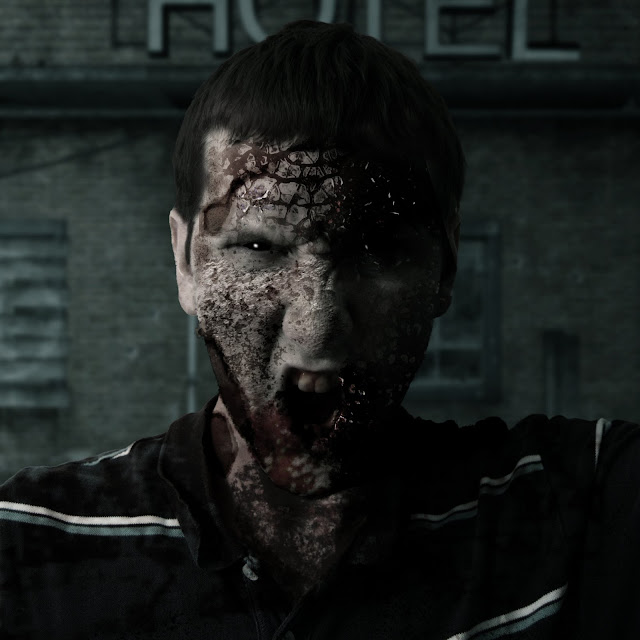
 |
| And there you have it. How to make a zombie using gimp. |

Excellent Alex! :)
ReplyDeleteGreat tutorial.
Cool tutorial. Thx.
ReplyDeleteNo problem. Glad you guys enjoyed it.
ReplyDeleteGreat tutorial Alex. Really liked the whole texturing process!
ReplyDeleteThis comment has been removed by the author.
ReplyDeleteGreat tutorial!!!! But I'm afraid i'm not so good yet hehe, mi zombie is not as good as yours... xD
ReplyDeleteBut I know my second zombie will be just great...
Greetings
By The Way... Here is my Zombie
http://a2.sphotos.ak.fbcdn.net/hphotos-ak-ash4/376425_2545804845073_1252345885_3023659_1771111064_n.jpg
That's not bad Gescobita! Thanks for sharing what you made from my tutorial. My biggest suggestion in your case is to create a new layer, set the layer moade to overlay, and fill the layer with a deep red color.
ReplyDeleteafter that, use a layer mask to brush in some more blood stains on your shirt.
Also, try adding a similar layer that would make the shirt look dirty. I think that will make a big difference.
this is amazing will have to try this using my hubby making a mugshot face
ReplyDeletewooow! am gonna invest more time on Gimp now !!
ReplyDeletegreat tutorial. thanks for sharing.
ReplyDeleteI think that part 2 MUST BE the Last one... If someone make mistakes, that mistakes not be visible on background!
ReplyDeleteP.S. Sorrz for mz english :)
Продајем половне гаће! Ко хоће да купи нек ме контактира...
ReplyDeleteThis was a very well done tutorial. Thank you for sharing. I'll definitely have to try this!
ReplyDeleteHere's my attempt. Not as good as yours, but my first complicated GiMP project so not too bad. http://www.facebook.com/photo.php?fbid=272208436176679&set=a.258843454179844.67062.100001625737116&type=1&ref=nf
ReplyDeleteVery nice tutorial, but confused about what layers are on top and in what order they are shown. Also, the black-eyes layer does not work correctly when I do the tutorial.I have tried placing it at every level, but with no success. Any input/help would be greatly appreciated!!!
ReplyDeleteIn the right side of this page there is an opportunity to sign up to my newsletter via email. Sign up to that and you will get a direct form of communication with me with which you can email your .xcf to me so I can see what you currently have. I'd share my email on here but I don't want to get spammed.
Deletesecond time of trying this, i must be doing something wrong with my layer masks because the screen just keeps filling up with black and staying that way. cool tutorial though
ReplyDeleteim having aa problem with the cuts on the zombie editing i make the paths and i turn them to a selection but when i try to fill with white nothing happens i even changed the fill tool so it filled the whole thing not just similar colors and it still doesnt work.
ReplyDeleteand when it does fill it fills with black for some reason. my first zombie i made was pretty good but i still couldnt do the cuts. i cant figure out what im doing wrong.
ReplyDeletePlease, help me. How can I fill the selection that is made from the paths? I cant make the gashes! Thanks for the tutorial.I'm Alk (to make it easier to answer me)
ReplyDeletehttps://fbcdn-sphotos-b-a.akamaihd.net/hphotos-ak-frc1/t31/1052447_10152207278092074_134969923_o.jpg
ReplyDeleteThis was mine! :D I hope this link works..
great tutorial!
Every page on http://gimpedtutorials.com/ just comes up "pageok", so part 1 of this tutorial is missing. (A fair few of your links go to this site, but I've found some -including this tutorial- via Google)
ReplyDeleteUseful post about how to make a zombie using gimp .
ReplyDeleteThis post is important and educative .
ReplyDeleteWell done
ReplyDeleteThat's a wonderful tutorial of zombie manipulation! I like it very much. I work at graphic design and this article is full of informative and useful information. Thank you so much for this.
ReplyDeleteThanks for sharing nice tutorial. I love Photoshop and its all effect. I'm photo editor so its very related to me.
ReplyDeleteNice tutorials. Good for photoshoper
ReplyDeleteWonderful tutorial. A lot of learn this post.
ReplyDeleteclipping path service | clipping path
Amazing Gimp tutorial. Its really very effective to learn. Clipping Path Specialist
ReplyDeleteThis post saves my day. Below are the services I can provide in this field.
ReplyDeleteClipping path service
whoah this blog is fantastic i like reading your articles. Keep up the great work! You know, lots of people are hunting around for this information, you could help them greatly.
ReplyDeleteHi there, I discovered your blog by means of Google even as searching for a comparable matter, your web site came up, it seems to be great. I've bookmarked it in my google bookmarks.
ReplyDeleteHello there, simply changed into alert to your weblog through Google, and located that it's truly informative. I am gonna watch out for brussels. I'll appreciate in case you continue this in future. Numerous people can be benefited from your writing. Cheers!
OMG, interesting photo editing. Nice post
ReplyDeleteThanks for the post on Gimp Tutorial: How to Make a Zombie Using Gimp! It is a great Tutorial. Great job by you. Thanks a lot!
ReplyDeleteHow To Set GIF As Wallpaper On Windows 10
This is a really informative article. I really enjoy this and hope I will get this type of informative article. I'm a photo editor you can check it out.
ReplyDeleteBackground Removal
Photo Retouch
Thanks and that i have a super present: What To Expect When Renovating A House home improvement near me
ReplyDelete