Monday, April 9, 2012

How To Use Gimp For Beginners Lesson 6 - Layer Modes

This gimp video tutorial touches base on a very powerful tool that if used properly can really improve on your photo editing. Layer modes allow you to dynamically change how your image appears by modifying how the layers underneath look.

Click here for the layer mask script I mentioned.

More gimp tutorials on layer modes:

How to make a Zombie Using Gimp.

My gimp zombie tutorial is an extensive lesson that uses several layer modes using both textures and simple colors.

How to use Gimp to convert color to black and white (selective Colorization):

This is the lesson that I talked about in the gimp video tutorial above when I mentioned selective colorization.

How To Make The Girl Cold and Scary Using Gimp.

A lot of this gimp tutorial focuses on using layer modes to modify eyes.

Photo Touch Up Using Gimp 101.

This Gimp tutorial talks about how layer modes can be used in a more practical fashion to enhance your images.

 <<<Lesson 5 - Layer Masks

Thursday, March 22, 2012

Isolate a Background Using Color - Gimp Video Tutorial

This Gimp Video Tutorial talks about a very cool discovery I recently made while writing my upcoming book on layer masks. I was digging through Gimp's documentation, and discovered exactly how Gimp looks at colors to determine how light or dark parts of any image is when you desaturate it.
This video talks about how you can take what I learned and apply it to your layer masking using gimp.

My book on layer masks can be found on Amazon.com for 4.99. Click here to take a peek inside!

The Photo used in this Gimp tutorial can be downloaded from here.

Free eBook - Principles of Photo Editing.

Related Tutorials:

Copy of Layer Mask Script:
How To Use Gimp For Beginners - Layer Masks explained:
How To Use Gimp For Beginners - Colors and Exposure:

Tutorials of photos shown in the beginning of the video:

Product Photography Using Gimp (Photo of Beer):
How To Make a Zombie Using Gimp:
How To Make a Girl Cold and Scary Using Gimp:
How To Make a Photo Look Vintage or Retro Using Gimp:

Friday, March 2, 2012

Gimp Video Tutorial - How To Use Gimp To Crop in Bulk

Script File: http://registry.gimp.org/files/export-layers.scm This Gimp video tutorial teaches you how to open several images and crop them down in an efficient manner. Related Tutorials: How To use gimp for beginners - Layers and Selections

Tuesday, February 7, 2012

Roughing Edges In - Quick Gimp Tutorial

This quick Gimp video tutorial will show you how to "rough in edges" using Gimp. Related Tutorial: Layer Masks Using Gimp

Sunday, January 22, 2012

Layer Masks Explained - Lesson 5 - How To Use Gimp For Beginners

This lesson explains how layer masks work, and will give you an open introduction to the power this tool can bring to your photo-editing. This is probably the most important lesson on this site, because without this tool you will never be able to effectively get the more complicated edits down.  

Related Posts:
 3 Tools Every Gimp User Should Know About.
Sign Up for my exclusive lessons and free eBook
Make a Logo Using Gimp
The Benefits of Shooting in RAW

My book on Layer Masks has finally been published, and is available on Amazon.com for 4.99! Click here to get a peek inside! Lessons Shown In Beginning and End of This Video:
 Product Photography Using Gimp (Beer Bottle Lighting)
How To Use Gimp To Make A Zombie
How To Use Gimp To Make The Tip Jar
Cool Wallpaper Design Using Gimp
 Exposing a Waterfall Using Gimp
How To Use Gimp To Make a Dramatic Tornado Scene

 <<<Lesson 4 - Adjusting Colors and Exposure

Sunday, January 15, 2012

Monday, January 2, 2012

Exposing A Waterfall Using Gimp

This Gimp tutorial will show you how to use gimp to turn this image:
Into this:
What You Will Need:
A Raw Shooting Camera (see my list of Affordable Raw Shooting Cameras, or The Benefits of Shooting in Raw.)
Part 1.) Taking the photos This is the most important part of this tutorial, because you're going to need to have more than one version of the same image using various settings on your camera. This is a prime example of one of my free exclusive gimp lessons about "developing your photo-editor vision," that you get for subscribing to my email list. First off, I took my "base photo," focusing on getting the majority of the image to expose. Here is what I did.
  1. I set my tripod up, and framed in the shot with my camera
  2. I turned my ISO to the lowest possible setting, and set my camera to shutter priority
  3. I adjusted the shutter speed down until I got a reasonably good exposure, referring to my histogram for reference
  4. Once I found a good exposure, I set my camera to fire after 10 seconds, so that I wasn't touching the camera when it fired the shot
I ended up with this photo:
This shot exposed nice, but the waterfall's fast motion made the waterfall blur.
Next, I took an "auxilliary photo," which is focused primarily on getting the fast-moving waterfall to expose properly. I turned my ISO to a much higher setting (800 I believe.) and turned my shutter speed way up. The goal here is to get the waterfall to expose better. I adjusted my shutter speed as high as I possibly could before losing the detail in the photo. I ended up with this picture:
You can't quite tell in this version, but the higher ISO setting made this image very grainy, but we don't care - all we want is the waterfall.
Part 2 - Combining the Photos Using Gimp and UFRaw
 The remainder of this lesson is in a gimp video tutorial. Enjoy!
Related Posts:
The Nature Hiking Photography Checklist.
Aperture, ISO, and Shutter speed explained.
 Layer Masks Explained
The Benefits of Shooting in Raw

Saturday, December 31, 2011

Checkerboard Text Using Gimp

This Gimp Video Tutorial will show you how to make checkerboard text using Gimp.

What you'll need:
A basic understanding of layers
An understanding of how layer masks work
A brief explination on how Gimp's interface works.

In this tutorial, I mention subscribing to Gimped! to create an easy open line of communication between you and me. That page can be found here.

Monday, December 26, 2011

Product Photography Using Gimp

In this gimp tutorial, I'm going to show you how to use gimp to do some product photography lighting using common household items. We're going to turn this:
Into this:
What You'll Need: Click here for a complete list of what you'll need for this project. Most of the things you need are common household items that most homes already have on hand. You'll also need UFRaw, and Gimp. Part 1 - Setup 1.) Get a Box and a Sheet of Cardboard
First off, get your box and a sheet of cardboard and lay them out like this. Both the box and sheet will be covered later
2.) Using Thumbtacks, Stick a black sheet to the cardboard sheet
Don't worry about the sheet not covering everything, the backdrop is pretty easy to duplicate using Gimp.
3.) Put a black sheet on your box
4.) Place your product

5.) Set up your tripod and camera  

Part 2 - The Photos
Now that you have your scene set up, simply set up your tripod and camera. You're going to take a series of several photos. It's very important that you do not move your camera, or the product during this process because we're going to tie these photos together in Gimp later. Set your camera to shutter priority, and adjust the shutter to a fairly slow speed, and crank your ISO setting to the lowest possible setting. If possible, set your focus to manual after autofocusing on your product, that way the camera doesn't try to focus on something else later. Finally, make sure you're shooting in RAW - this will give you unbeatable flexibility when doing this project (as always, I have a list of affordable raw shooting cameras available.). The only light that is going to be used in this scene is your LED flashlight, and a as much ambient light as possible without compromising the contrast that your LED flashlight can put out. In other words, turn your LED light on, and adjust your light until you find a good balance of contrast and light between your LED light and your ambient light.  
1.) The Scene
I held the flashlight up high, and aimed it at the top surface of the box. I set my camera to go off after 10 seconds, and held the flashlight in place. Keep adjusting your shutter speed until your photo exposes like so.
2.) The bottle's lighting
 Take a series of different photos at different angles. Take a ton of photos of different angles, intensities, and angles with your LED flashlight.
It's very important to get all of the photos on the right side before removing the box. Once you move the box it will be difficult to get it in the exact same position as it was in before, making it a lot harder to edit your photo.
Part 3: How To Use Gimp To Put It All Together
The final part of this tutorial consists of taking all of the information we gathered with our photos, and putting them together with Gimp and UFRaw. Check out the video below for the complete tutorial.

Related Topics:
Layer Mask Gimp Video Tutorial
 How To Use Gimp For Beginners - Layers
 The Benefits of Shooting in Raw
  Affordable RAW-Shooting Cameras

Saturday, December 17, 2011

Practical HDR Using Gimp

This tutorial will help you learn how to use gimp to make HDR images in a practical way.  

What You'll Need:
A RAW-Shooting Camera. Check out my list of Affordable RAW-Shooting Cameras. 
  UFRaw gimp addon  

More Information:
Related lesson - Layer Masks Using Gimp
The Benefits of Shooting in Raw  

Original Image:
Final Image:
Gimp Video Tutorial:

Saturday, December 3, 2011

Gimp Video Tutorial: How to use GImp to make a Cool Wallpaper Design

This gimp video tutorial will show you how to make a cool background wallpaper using GIMP.

 Recommended Prerequisites:
Layer Mask Gimp Video Tutorial Layer Modes Gimp Video Tutorial
Gimp for beginners lesson 3 - Layers and Selections
  Principles of Photo Editing 
  Running my website, and making my tutorials takes a lot of time, and a little money to make. Please help keep Gimped! free by donating.
Related Videos:
How to use Gimp to make a logo 

If you liked this video Please share it!  

Wednesday, November 23, 2011

How To Use Gimp To Make a The Tip Jar

In this lesson, I'm going to show you how to make the Tip Jar icon I am using for my donate button shown in the right column of this page. The beauty of the way this image is set up is that you can easily change what color the glass on the jar is, and also easily change the background. As usual, we're using layer masks to get this job done. Here is the final result:
What You'll Need:
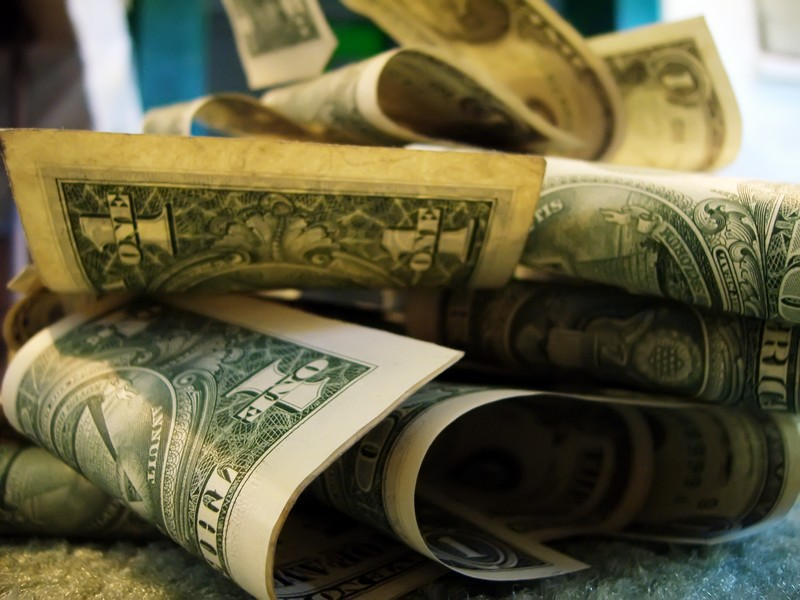
Money by ~richardxthripp Jar by ~dropoflight
Gimp Paint Studio (Recommended addon) 
Suggested Prerequisites:
An Understanding of Layers
An Understanding of Layer Masks
Another Layer Mask Video (highly recommended)
Free Gimp eBook - Principles of Photo Editing  

Part 1: How To Use Gimp To Make the Jar 

I felt that this part of the gimp tutorial was a bit tricky, and felt it was best explained as a video.

Part 2: How To Use Gimp To Make the Sticky Note
   
Create a new file, make it 800X800 pixels. Click on the blend tool set the foreground and background to two different shades of yellow, and create a gradient from the top to the bottom of the image. Your notepad should look something like this:
Although it's very subtle, the gradient makes the note feel more "alive"
Using the text tool, and find a font you like and type TIPS in all capital letters.
Adjust the font size until it is something you're happy with. I used this font.
 Right-click on the text layer, and click "Text To Path" this will create a path from the text you typed.
Create a new layer. Name it TIPSBrush
Make sure you're editing the TIPSBrush layer, and right-click on the newly created path from text and click "path to selection" get your brush tool, and set it to the "chalk" preset. This ONLY works if you have the GPS addon installed.
Set your brush color to black, and fill in the selection with the brush tool so that it creates an effect similiar to my finished notepad shown above.
Click select>>>none underline the text with a single stroke. This is a lot easier with a wacom tablet, but definitely doable with a mouse.

Part 3: How To Use Gimp To Place the Note on the Jar

 right-click on your completed sticky note, and click "new from visible."
This will create a new layer from the visible layers for you to place into your jar.
Simply drag the newly created layer and drop it into the opened jar image.

You should end up with something like this:
That looks good, but the sticky note wouldn't look so perfect. Let's make it look more real.
Click on the perspective tool, and then click on the sticky note. Edit it so it looks something like this:
That's better, but the curve of the bottle would make the top have a slight arc.
Add a layer mask to the sticky note, initilize the mask to white.
Using the paths tool, create a path that runs across the top corners in a slight curve like this:
hit the enter key after drawing your path. This should make a selection. If that doesn't work, right click on your path and click "path to selection. Make sure you're editing your sticky note layer mask and fill the selection with black. Click select>>>none (or press CTRL+SHIFT+A). Your image should look like this.
The sticky note looks like it was placed randomly, and looks much more in place now.
Part 4: How To Use Gimp To Add the Money

Open up the money file you previously downloaded.
Using the paths tool, trace the outer edge of the money. This will take a lot of time, be patient.
After your path is completely made, press the enter key to make your selection. Press edit>>>copy or CTRL+C to copy the selected money from the image Switch back to your Tip Jar Press CTRL+V or click edit>>>paste to paste the previously copied money into the image.
In the layers dockable dialog, you will see a new layer has been created called "floating selection." right click on that and click "new layer." this will place the money into your tip jar image.
Rotate the money, and place it behind the jar and notepad image.
Duplicate the money layer. click on the rotate tool, and rotate the duplicated money tool 180 degrees. Move both money layers around until you are happy with you come up with.
You may have to erase some "floating pieces" of money and also hide some straight edges behind the notepad. I ended up with this:
You'll notice I made some tweaks to how the sticky note looks. I used the same tools shown above, but later decided that it didn't look as good as I wanted it to look and started over.

Tuesday, November 8, 2011

Gimp Video Tutorial - How to use gimp to create a logo

In this Gimp video tutorial I teach you how to use gimp to create a logo.  
First, make sure you have seen these Gimp Tutorials:
Gimp Video Tutorial - Layers
Gimp Video Tutorial - Layer mask
Free Gimp eBook - Photo-Editing Principles The site using this logo can be found here.

Tuesday, October 25, 2011

Gimp Tutorial: How to Make a Zombie Using Gimp

In this gimp tutorial, I'm going to show you how to make a zombie using gimp.
What you will need:
Stock Image 1
Stock Image 2
Stock Image 3
GPS (Gimp Paint Studio) addon (suggested, not required.)

Suggested Prerequisites:
An understanding of how Layer Masks and Layer Modes work.
An understanding of how the color modification tools work.
An understanding of my Photo Editing Principles.

Suggested Tools:
Wacom Tablet
Raw-Shooting Camera. (Check out my list of affordable Raw-Shooting Cameras)
Tripod
Gimp Bible
My eBook on Layer Masks.

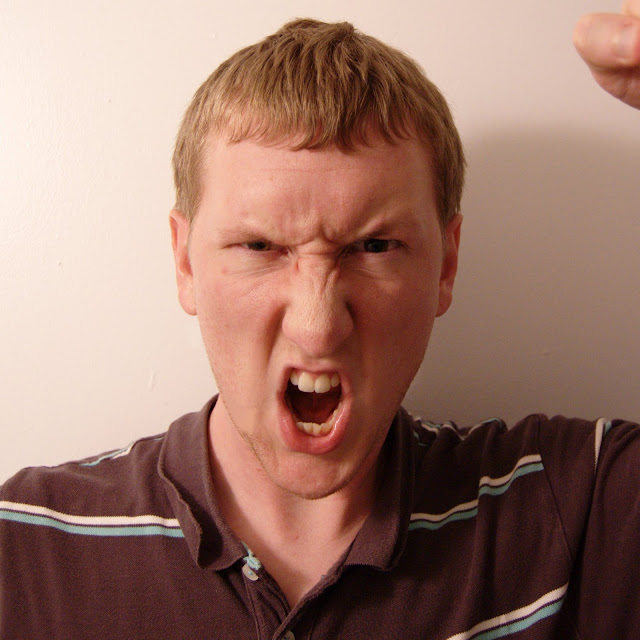
We're going to start with this photo:
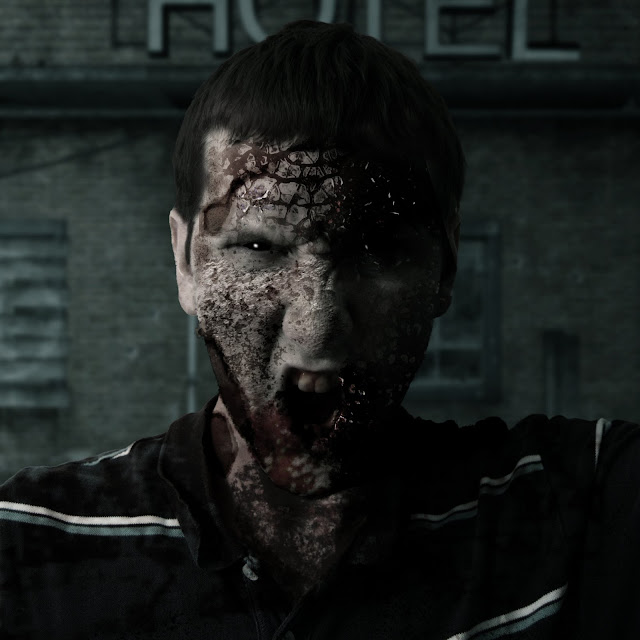
and make a zombie like this photo:
Zombie Tutorial Part 1 - Isolating the image from the background:

Your photo should end up looking similar to this:
Reminds me of the old iPod commercials...who knew they were secretly zombies?
Right-click on the black and white "silhouette" image, and click "add layer mask." initialize the mask to "grayscale copy of layer." this will effectively transfer the layer over to the layer mask side.
Right-click on the silhouette layer mask, and click "mask to selection."
Right-click on the original image, and click "add layer mask." initialize the layer mask to "selection." This will transfer the black and white image you created to an actual layer mask.
delete the previously created black and white layer. You no longer need it. You'll end up with this:
Ugh. Zombie Breath.
Zombie Tutorial Part 2 - The background and Style
Adding a good background to this zombie tutorial was vital in keeping a good effect, without taking away from the zombie itself. After a lot of searching, I found the perfect stock image for it.
Insert the background stock image you downloaded earlier under your existing face layer by clicking file>>>open as layers>>>(browse to the file)
Drop the file down underneath the original human layer.
create a new layer. Name the layer "BGLightFix" Set the layer mode to overlay. Place this layer
in-between your background and zombie layers.
Fill the BGLightFix with a white to black gradient (going from left to right.) This will make the background look like the light is coming from the same side as the light came from in the zombie image.
The hotel background really sets the mood for the rest of the image, I thought.

Create a new layer, set the layer mode to overlay, fill the layer with teal, and name the layer "bluetint"
Create a new layer, name the layer "EyePop." Set the layer mode to overlay, and fill the layer with black. Adjust the opacity to 80.
Add a layer mask, initialize the layer mask to white (full opacity.)
Using the brush tool, and ensuring you're editing the layer mask, brush the eyes black to remove the overlay from them. This is vital to making the eyes pop out.
Create a new layer, name the layer "ColorReduce." set the layer mode to color, and fill the layer with black. Adjust the opacity to something you like. (Mine is set to 80.) It looks like this:
Adjusting the tones of the images makes me look more zombie like, and also sets a creepy mood for the image.

MAKE SURE EVERY LAYER ADDED FROM HERE ON IS PLACED UNDER THE "COLOR REDUCE" "EYEPOP" AND "BLUETINT" LAYERS. otherwise something will look "funny" in your image.
Zombie Tutorial Part 3 - Grunging it up.
No zombie should be clean. Not one square inch.
Create a new layer, name it "dirt." set the layer mode to burn, and fill the layer with black.
Add a layer mask, initialize the mask to black (full transparency.)
Using the brush tool, find a brush that creates small particles (a great example is the "dust" preset from Gimp Paint Studio) brush the dirt layer mask with white until you end up with something like this:
My Gimp Zombie Tutorial will make your zombie dirty.

Create a new layer, name the layer "blackeyes" and fill the layer with black.
Add a layer mask, initialize the layer mask to black. (full transparency)
Using the brush tool, and brushing on the blackeyes layer mask, fill the whites, iris, and pupil of each eye with black.
Create a new layer, name the layer "EyeHighLight." Fill the layer with white, and set it's layer mode to "screen."
add a layer mask, initialize the layer mask to black (full transparency.)
Using the brush tool, and brushing on the EyeHighLight layer mask, brush a small circle, in the left eye and a small crescent shape in the right eye. This is meant to emulate light coming from a light source, and helps keep depth in the eye. It looks like this:
A lot of people go with the glowy white zombie look. I always thought that just looked like a Night Elf. I don't want to be a Night Elf, I want to be a ZOMBIE!

Create a new layer, fill the layer with black and name the layer "DarkSockets." Set the layer mode to Overlay.
Add a layer mask, initialize the layer mask to black (full transparency.)
Using a soft brush, brush around the lower side of each eye to create some eye pockets, making our zombie look more sick.


Zombie Tutorial Part 4 - The Gashes
If you take your time giving your zombie gashes, and actually add the shadows properly, these can make or break the image.
Now create a series of three layers. Set each layer to overlay. Fill each layer with black, and have a layer mask initialized to Black (full transparency) on each layer. Name one "Form", one "Cut," and another "Shadow."
Create a few paths that can serve as gashes, like you see in the image below:
Don't try to make the gashes jagged. The goal of the paths tool is just to create the general shape. We'll make the edges more rough later.

Right click on one of the paths you created, and click "path to selection."
click on your "form" layer mask, and fill the selection with white.
Click on your "Cut" layer mask, and fill the selection with white.
Repeat this process for each gash you created. Mine look like this:
Note that my top path was actually done by stroking a path, not filling a selection from a path. That's why it looks different.

Assuming you're using the GPS tool set, use a rugged brush preset like the oil brush, and brush the edges of your "form" and "cut" layer masks black. to give a rugged and more natural look to your gashes sort of like this:
And this is why we have two separate layers. Together they will create rough edges, and a "light red ring" around the gash, as if the skin were irritated, or raised up a bit.

Next, use the same rugged brush on your "shadow" layer mask to create shadows. Pay attention to the light source, and think about where a shadow would be if your skin was sticking up in your gashes. Ignoring the edge, brush that area white to create your shadow. Switch to black, and then "trim off" the excess parts of the shadow (the part that goes over the edge, and parts of the shadow that go too far into the gash.) I ended up with this:
And this is why we have the third layer, specifically for the shadows that really pull the gashes together.

Use a splatter-type brush (similar to what you used earlier for the "dirt" layer) and brush some random splatters on the form and cut layer masks. Be sure to keep the splatters on the face, and do not cross edges that would make it look unrealistic (ears, nose, eyes, etc.)
I added a few more gashes using the same steps above to my neck and the opposite side of my face.
Here is what I ended up with:
No Gimp Zombie tutorial is complete without some sort of blood splatter.

Zombie Tutorial Part 5 - The Hair
I had no idea what to do with the hair honestly, so I just made my zombie hair dark.
Create a new layer, fill the layer with black, and set the layer mode to "burn." Adjust the opacity to 50 percent, and name the layer "hair blacken."
Add a layer mask to the hair blacken layer and initialize it to black (full transparency).
using a soft brush tool, and ensuring you're working on the hair blacken layer mask, carefully brush the zombie's hair white. I ended up with this:
Truthfully, I wish I were balding at this point.

Zombie Tutorial Part 6 - The Cracked Forehead
click file>>>open as layers>>>browse to the file titled "Rust_by_struckdumb.jpg" that was previously downloaded.
This should insert the rust image as a new layer into your current zombie image. Move this image directly above your original zombie image (that way every other layer is above it.)
click on colors>>>curves, and adjust the curves of the rust until you get a very strong contrast of white and black between the parts.
Rotate and scale the rust image. Your image should now look something like this:
Add a layer mask. Initialize the layer mask to "grayscale copy of layer."
Make sure you're editing the rust layer's layer mask, and click colors>>>invert
set the layer mode to overlay. You should end up with this:
Think about what the grayscale copy of layer initialization did here. As the rust gets lighter, it gets more transparent. The dark parts stay opaque, emulating cracked skin fading back into normality.

Using a white brush (preferably a rough one like the oil brush mentioned earlier) brush on the layer mask to remove unwanted parts of the rust. Mine ended up like this:
Duplicate the rust layer, name it rustdarken.
Using a rough white brush, brush on the newly duplicated rust layer's layer mask and remove parts of the rust that made the image too dark. I ended up with this:
duplicate the rustdarken layer.
fill the newly duplicated rust layer with black. Keep the layer mask as it is.
click on the layer mask, click filters>>>blur>>>Gaussian blur
blur the layer mask a bit. This will make the skin in-between the cracks appear red and irritated. I ended up with this:
Zombie Tutorial Part 7 - The Boiling Skin
The rust image you use here makes your skin look absolutely disgusting! It would be perfect to use for burnt skin, or - well...a zombie!
click file>>>open as layers>>>browse to the file titled "Rust_Bubbles_by_DimondDoves.jpg"
Move this layer directly above the original zombie layer.
desaturate the new rust layer
click colors>>>curves>>adjust the curves so that the rust has a dramatic difference between white and black.
Scale, rotate, and skew the rust image in a way that you're happy with it. Mine ended up like this:
 

Set the layer mode to overlay.
Add a layer mask. set the layer mask to black (full transparency).
using a white brush, brush on the layer mask to remove the rust so it looks something like this:
Yuck.

Zombie Tutorial Part 8 - The Chin and Neck
click file>>>open as layers>>>browse to the file titled "Rust_by_struckdumb.jpg" that was previously downloaded.
click filters>>>blur>>>Gaussian blur>>>blur the inserted rust image slightly.
move and rotate the rust image toward the chin. I ended up with this:
set the layer mode to burn. Add a layer mask, and initialize the layer to black (full transparency).
using a rough white brush (like the previously mentioned oil brush preset from GPS), mask off the layer so the bloody patch only shows up on the chin and some of the teeth. I ended up with this:
repeat the same general process for the neck, ending up with this:
Zombie Tutorial Part 9 - Final Touches
Add 3 layers named "blood 1" "blood 2" and "blood 3." Set each one to layer mode "overlay" and add a black layer mask to them. Fill each layer with a deep red color.
on the blood 1 layer, use a white splat-type brush (like the GPS dust brush) and a few other rough brushes on the layer mask. Brush the shoulders and neck area to make shirt look bloodstained. I ended up with this:
on the blood 2 layer, use a white rough brush (like the GPS oil brush) and brush on the layer mask. Brush the inside of the mouth, and the teeth to make the teeth look bloodstained. I ended up with this:
Do the same thing to the blood 3 layer as you did to the blood 2 layer. The goal here is to have some intersecting strokes that will make some parts of the teeth darker red than others, like this:
The dark red instead of black makes great bloodstains.

And there you have it. How to make a zombie using gimp.

Wacom Tablet

In my Gimp Tutorials, I frequently use Wacom Tablets. Here is an awesome wacom tablet I recommend using.
A Wacom tablet will enhance your GIMP photo editing experience by offering a pressure-sensitive touch that translates to varying transparency when making brush strokes in GIMP.

Gimp Reference Manual

I highly recommend getting this Gimp book to use as a reference manual in conjunction with my tutorials. This book will explain how the tools I use work. My tutorials will give you practical applications for the tools shown in this book.